
Table of Contents
Quick Refresh: Learn about Autohost Process Flow
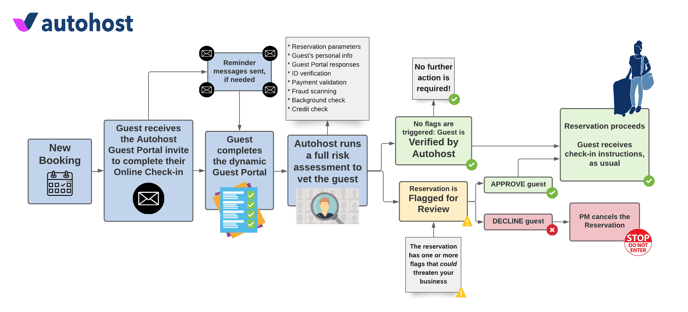
To learn more about the process flow, refer to this help center article.
Update your Listing's Marketing Material
Now that you've learned about the verification process you will introduce to your message flow, it's time to introduce it to your guests, too. Your guests must know that they will be asked to complete a verification step in order to receive their check-in instructions.
To communicate this to the guest, refer to the article Sample Messaging for OTAs for guidance on how to explain the purpose of the Autohost verification process.
Be sure to do this for ALL of your marketing material that is read by guests. This includes:
-
Your listing description,
-
Rental Usage Agreement
-
House Rules
-
FAQ pages
-
Any other material that is read by the guest.
Handle Pre-existing Reservations
First, let's decide how you would like to handle the pre-existing reservations.
Pre-existing reservations include guests who will arrive today or in the future. Current guests will not appear.
You have two options:
Option 1: 'Blind' Approve all pre-existing reservations and start fresh
Pick a future date when you would like to start screening guests using Autohost.
Option 2: Screen all pre-existing reservations and message guests
If you choose this option, please contact your Onboarding Specialist for guidance.
Enable Listings on Autohost
Log on to Autohost, and go to Listings > Select ALL or desired listings (if preferred) > Bulk Edit > Set listings as ACTIVE.
Next, let's import your pre-existing reservations from your PMS into Autohost. Navigate to Screening Assistant > Import > Click START IMPORT under Import Reservations.
If you chose OPTION 1, follow these steps to handle your pre-existing reservations:
Option 1:
-
On Autohost, go to the Reservations tab.
-
Open this link/URL: https://portal.autohost.ai/reservations/?onboard=1
-
Scroll down, and increase rows per page to 100. This will allow you to view your pre-existing reservations on one page.
-
Check off the top left checkbox to select ALL reservations. Once you do this, a button will appear on the top right of the screen titled 'Bulk Edit'.
-
Click Bulk Edit > Blind Approve Reservations. This will allow you to omit/skip screening on your pre-existing reservations.
-
If you have more than 100 pre-existing reservations, you can proceed to the next page by using the page counter at the bottom left.
Enable New Message Flow on Hospitable
-
Log on to Hospitable, and go to Guest Experience > Messaging Rules.
-
Enable/toggle ON the (new) AH Check-In Instructions message, and disable the old/existing check-in message.
-
Enable/toggle ON the (new) AH Booking Confirmation message, and disable the old/existing booking confirmation message.
Enable New Message Flow on Autohost
-
Log on to Autohost.
-
Enable the (new) AH Reminder 1 and 2 messages.
Congrats! You are now officially protecting your properties with Autohost. Take the next few days to learn the tool, and get comfortable with this new process. To help you apply your learnings from this implementation, bookmark and read the following article with your team: You're Live... Now What?