
We will refer to this page to test your integration with Streamline.
First, let's create a new listing/home on Streamline:
Skip this step if you already have a test listing/home you created on Streamline for testing purposes.
-
On Streamline, go to Main > Tools > New Property.
-
Name your new listing/home 'Autohost House - Test'.
-
Next, fill out the remainder of the required fields for this new listing/home. They are marked with an asterisk (*).
-
Once the required fields have been filled out, click Submit.
Nice! Second, let's create a new reservation on Streamline:
-
On Streamline, go to Main Menu > Reservations > Quick Book.
-
Input your name as the guest (remember, this will be our test reservation), and proceed to fill out the required fields marked with an asterisk (*).
-
When asked to associate the reservation with a unit, assign it to Autohost House - Test (this is the new listing/home we created above).
-
Once complete, click Make a Reservation.
-
Great! You have now created a 'test' reservation under your first and last name.
Lastly, let's enable the new listing on Autohost:
-
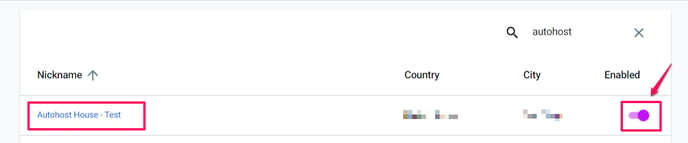
On Autohost, go to Listings, and search for 'Autohost House - Test'. Click the toggle icon to enable it. (If it doesn't appear immediately, give it a few minutes for it to load).
-
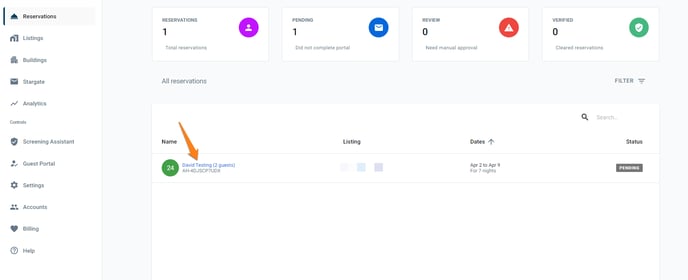
Go to Reservations tab and refresh the page. Once refreshed, click on your test reservation.
-
Click on Links tab to view the individual screens enabled on the Guest Portal.
%20of%20the%20Guest%20Portal%20on%20Autohost.png?width=688&name=Screenshot_Where%20to%20View%20the%20Individual%20Pages%20(Validation%20Links)%20of%20the%20Guest%20Portal%20on%20Autohost.png)
%20of%20the%20Guest%20Portal.png?width=688&name=Screenshot_How%20to%20View%20the%20Individual%20Pages%20(Validation%20Links)%20of%20the%20Guest%20Portal.png)
-
On this page, you can open the URL of the individual screens to view them.
-
Nice! You've just completed a test verification and have confirmed that the Guest Portal screens are functional!
-
The last step will be set up on Autohost before you enable the listings. Contact your Onboarding Specialist to book your go-live meeting.