
Table of Contents
Tip: To help with your message setup, open this Streamline Message Set Up Guide in an adjacent browsing tab to your Streamline account, so you may easily switch between the two tabs for copying and pasting of templates.
1. Autohost Process Flow
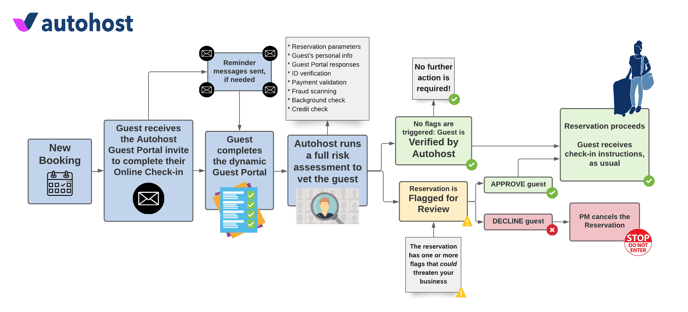
To learn more about the process flow, refer to this help center article.
Note: In this guide, the words 'message' and 'document' are used synonymously.
2. Set up your Message Templates
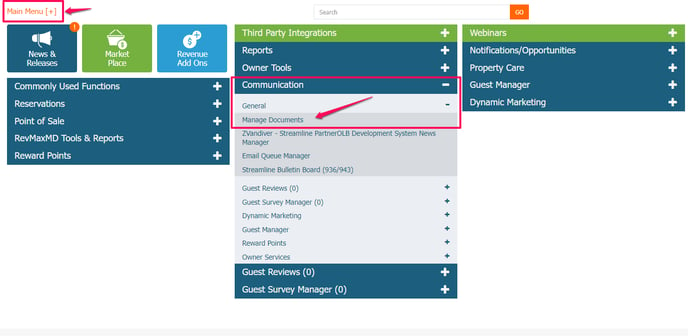
- On Streamline, go to Communication > General > Manage Documents
- On the Manage Documents page, scroll to the bottom and click Add New Document

- Create the following Message Templates:
a. Autohost Booking Confirmation
The intention of this communication is for the guest to review their reservation details and complete their guest verification.
Please follow the steps below to create the Autohost Booking Confirmation:
- STEP1 -
Name your document:
Autohost Booking Confirmation

Click 'Continue' to the next page >>
- STEP 2 -
Would you like to use an email trigger?:
Yes
Email Subject:
Thank You For Booking ({global.reservation.id})
Pick your trigger and delay:
Booking Confirmation
-1.png?width=688&height=166&name=Screenshot_How%20Add%20a%20New%20Document%20on%20Streamline%20(Step%202.1)-1.png)
Now, scroll down to the bottom of the page, and click Continue >>
- STEP3 -
Who will receive?
Guests

Click 'Continue' to the next page >>
- STEP4 -
Choose which properties use this document:
Select desired 'Resorts' and 'Homes' or select 'All system properties'
.png?width=663&height=194&name=Screenshot_How%20Add%20a%20New%20Document%20on%20Streamline%20(Step%204).png)
Click 'Continue' to the next page >>
- STEP5 -
Attach PDF's or other files to be attached to the emails:
Files are not required for this document, but choose any applicable PDFs or files desired.
.png?width=680&height=332&name=Screenshot_How%20Add%20a%20New%20Document%20on%20Streamline%20(Step%205).png)
Click 'Continue' to the next page >>
*STEP6 is skipped. You will automatically move from STEP5 to STEP7.
- STEP7 -
Select status active/inactive:
InActive
.png?width=688&height=199&name=Screenshot_How%20Add%20a%20New%20Document%20on%20Streamline%20(Step%206).png)
Note: We will change this status to 'Active' on the Go Live call.
Click 'Continue' to the next page >>
- STEP8 -
Click on the blue hyperlinked text "here" (highlighted below) to review your new document. Document editor will appear in a new pop-up.
.png?width=688&height=93&name=Screenshot_How%20Add%20a%20New%20Document%20on%20Streamline%20(Step%207).png)
Review, and click Submit.
.png?width=688&height=458&name=Screenshot_How%20Add%20a%20New%20Document%20on%20Streamline%20(Step%208).png)
- STEP9 -
Click 'Go To Documents List', search for "Autohost Booking Confirmation". Once your document appears, click on the pencil icon 'Editor' to add your message copy.
.png?width=688&height=64&name=Screenshot_How%20Add%20a%20New%20Document%20on%20Streamline%20(Step%209).png)
- STEP10 -
In a new Message pop-up, edit the copy as follows:
Hi {reservations.first_name},

Thank you for booking a stay with us!

Please review the following reservation details:
{reservations.unit_name}
Check-in: {reservations.startdate}
Check-out: {reservations.enddate}
Number of Guests: {reservations.occupants}

To ensure the safety of our guests, staff, properties, and community; we require all guests to complete our secure guest verification portal as noted in our listing description.
Please complete the guest verification portal linked below ahead of your check-in date, to ensure your check-in instructions are sent ahead of your arrival.

https://verifyhub.org/{global.reservation.id}

Please note: The Guest Verification Portal may take up to 30 minutes to generate your reservation details post booking.

We look forward to hosting you!

Thank you,

{companies.name}
Review the message copy for error, ensure all custom variable 'tags' are correct. Once reviewed, proceed to save the message template by clicking 'Complete Modification' 
Note: In the above Message Copy we noted the 30 minute delay it takes for Streamline to share reservation details to Autohost, thus causing the Guest Portal link to be inactive for up to 30 minutes post booking. Alternatively, you may change the text to be "Please note: To ensure the safety of our guests, staff, properties and community; we require all guests complete our secure guest verification, as noted in the listing description. Keep an eye out for a separate email with the Guest Verification link and details." If you chose this option you may use Reminder 1 as your first intial message with the Guest Verification link.
b. Autohost Reminder(s)
The intention of the reminder messages are to remind any guests who did not complete the guest portal to complete it before their arrival. Most guests fall into two different personality types when it comes to booking stays, they either like to get everything done and checked off in advance, or they wait until the last minute to review any information regarding their upcoming stay. To ensure we meet the needs of both personality types, we recommend the following reminder message sequence:
| Reminder 1 (highly recommend): | 1 day after reservation booking |
| Reminder 2 (encouraged): | 2 days after reservation booking |
| Reminder 3 (encouraged): | 3 days after reservation booking |
| Reminder 4 (encouraged): | 7 days before guest arrival |
| Reminder 5 (highly recommend): | 5 days before guest arrival |
| Reminder 6 (highly recommend): | 3 days before guest arrival |
| Reminder 7 (highly recommend): | 2 days before guest arrival |
| Final Urgent Reminder (strongly recommended): |
24 hours before guest arrival (or aligned with designated time check-in instructions are sent) |
*If applicable, a reminder for payment in subsequence with a reminder for verification would be a great communication flow.
Note: Reminder messages are utilizing conditional logic by way of 'flags', that will only apply to those guests who have not completed the guest portal. Once guests have completed the guest portal they will not receive any further reminder messages. Additionally, if the property manager approves or declines a guest, it will also discontinue any additional reminder messages.
Proceed to create the following documents for Reminders 1-3 as desired:
On the Manage Documents page, scroll to the bottom and click Add New Document.
- STEP1 -
Name your document:
Autohost Reminder 1-3 (X days after booking confirmation)

Click 'Continue' to the next page >>
- STEP2 -
Would you like to use an email trigger?
Yes
Email Subject:
Friendly reminder to verify your reservation
 Pick your trigger and delay:
X Days after booking & Flag NEVER selected: Autohost Guest Portal Completed

Click 'Continue' to the next page >>
- STEP3 -
Who will receive?
Guests
Click 'Continue' to the next page >>
- STEP4 -
Choose which properties use this document:
Select desired 'Resorts' and 'Homes' or select 'All system properties'
Click 'Continue' to the next page >>
- STEP5 -
Attach PDF's or other files to be attached to the emails:
Files are not required for this document, but choose any applicable PDFs or files desired.
Click 'Continue' to the next page >>
*STEP6 is skipped. You will automatically move from STEP5 to STEP7.
- STEP7 -
Select status active/inactive:
InActive
Note: We will change this status to 'Active' on the Go Live call.
Click 'Continue' to the next page >>
- STEP8 -
Click on the blue hyperlinked text "here" (highlighted below) to review your new document. Document editor will appear in a new pop-up.
Review, and click Submit.
- STEP 9 -
Click 'Go To Documents List', search for the recently created "Autohost Reminder" message. Once your document appears, click on the pencil icon 'Editor' to add your message copy.

Edit the Message Copy as follows:
Hi {reservations.first_name},

This is a friendly reminder that your reservation is not yet verified.
Please take a moment to verify your reservation by completing our secure Guest Verification portal below:

https://verifyhub.org/{global.reservation.id}

We thank you for your participation in keeping our homes and communities safe!

Thank you,
{companies.name}

Click 'Complete Modification' to save.
Proceed to create the following documents for Reminders 4-7 as desired:
On the Manage Documents page, scroll to the bottom and click Add New Document.
- STEP1 -
Name your document:
Autohost Reminder 4-7 (X days(s) before check-in)
Click 'Continue' to the next page >>
- STEP2 -
Would you like to use an email trigger?
Yes
Email Subject:
Reminder to verify your reservation
Pick your trigger and delay:
X Days Before Check-In and Flag Off : Autohost Guest Portal Completed

Click 'Continue' to the next page >>
- STEP3 -
Who will receive?
Guests
Click 'Continue' to the next page >>
- STEP4 -
Choose which properties use this document:
Select desired 'Resorts' and 'Homes' or select 'All system properties'
Click 'Continue' to the next page >>
- STEP5 -
Attach PDF's or other files to be attached to the emails:
Files are not required for this document, but choose any applicable PDFs or files desired.
Click 'Continue' to the next page >>
*STEP6 is skipped. You will automatically move from STEP5 to STEP7.
- STEP7 -
Select status active/inactive:
InActive
Note: We will change this status to 'Active' on the Go Live call.
Click 'Continue' to the next page >>
- STEP8 -
Click on the blue hyperlinked text "here" (highlighted below) to review your new document. Document editor will appear in a new pop-up.
Review, and click Submit.
- STEP 9 -
Click 'Go To Documents List', search for the recently created "Autohost Reminder" message. Once your document appears, click on the pencil icon 'Editor' to add your message copy.
Edit the Message Copy as follows:
Hi {reservations.first_name},

Your stay is quickly approaching!

This is a friendly reminder that your reservation is not yet verified.
Please take a moment to verify your reservation by completing our secure Guest Verification portal below:

https://verifyhub.org/{global.reservation.id}

As a reminder, check-in instructions will not be sent until guest verification is complete.

We thank you for your participation in keeping our homes and communities safe!

Thank you,
{companies.name}

Review the message copy for error, ensure all custom variable 'tags' are correct. Once reviewed, proceed to save the message template by clicking 'Complete Modification'.
Proceed to create the following document for the Final Urgent Reminder:
On the Manage Documents page, scroll to the bottom and click Add New Document.
- STEP1 -
Name your document:
Autohost Final Urgent Reminder (24-48 hours prior to arrival)
Click 'Continue' to the next page >>
- STEP2 -
Would you like to use an email trigger?
Yes
Email Subject:
Urgent Reminder to verify your reservation
Pick your trigger and delay:
X Days Before Check-In and Flag Off : Autohost Guest Portal Completed

Click 'Continue' to the next page >>
- STEP3 -
Who will receive?
Guests
Click 'Continue' to the next page >>
- STEP4 -
Choose which properties use this document:
Select desired 'Resorts' and 'Homes' or select 'All system properties'
Click 'Continue' to the next page >>
- STEP5 -
Attach PDF's or other files to be attached to the emails:
Files are not required for this document, but choose any applicable PDFs or files desired.
Click 'Continue' to the next page >>
*STEP6 is skipped. You will automatically move from STEP5 to STEP7.
- STEP7 -
Select status active/inactive:
InActive
Note: We will change this status to 'Active' on the Go Live call.
Click 'Continue' to the next page >>
- STEP8 -
Click on the blue hyperlinked text "here" (highlighted below) to review your new document. Document editor will appear in a new pop-up.
Review, and click Submit.
- STEP 9 -
Click 'Go To Documents List', search for the recently created "Autohost Reminder" message. Once your document appears, click on the pencil icon 'Editor' to add your message copy.
Edit the Message Copy as follows:
Hi {reservations.first_name},

Your check-in instructions can not be sent as we have identified that you have not yet completed our guest verification.
Your stay is at risk of cancellation if guest verification is not completed soon.

To verify your reservation and receive your check-in instructions, please complete the guest verification link below:
https://verifyhub.org/{global.reservation.id}

Thank you,
{companies.name}

Review the message copy for error, ensure all custom variable 'tags' are correct. Once reviewed, proceed to save the message template by clicking 'Complete Modification'.
c. Check-In Instructions
On the Manage Documents page, scroll to the bottom and click Add New Document.
- STEP1 -
Name your document:
Autohost Check-In Instructions
 Click 'Continue' to the next page >>
- STEP2 -
Would you like to use an email trigger?
Yes
Email Subject:
Check-in details for your upcoming reservation:

Pick your trigger and delay:
X or Less Days Before Check-In and Flag On

Click 'Continue' to the next page >>
- STEP3 -
Who will receive?
Guests and any other desired recipients.
- STEP4 -
Choose which properties use this document.
Select desired 'Resorts' and 'Homes' or select 'All system properties'
Click 'Continue' to the next page >>
- STEP5 -
Attach PDF's or other files to be attached to the emails:
Files are not required for this document, but choose any applicable PDFs or files desired.
Click 'Continue' to the next page >>
*STEP6 is skipped. You will automatically move from STEP5 to STEP7.
- STEP7 -
Select status active/inactive:
InActive
Note: We will change this status to 'Active' on the Go Live call.
Click 'Continue' to the next page >>
- STEP8 -
Click on the blue hyperlinked text "here" (highlighted below) to review your new document. Document editor will appear in a new pop-up.
Review, and click Submit.
- STEP 9 -
Click 'Go To Documents List', search for the recently created "Autohost Check-in Instructions" message. Once your document appears, click on the pencil icon 'Editor' to add your message copy.
Edit the Message Copy as follows:
Hi {reservations.first_name},

[Insert check-in instruction details.]

Thank you,
{companies.name}

Review the message copy for error, ensure all custom variable 'tags' are correct. Once reviewed, proceed to save the message template by clicking 'Complete Modification'.