Quick Refresh: Learn about Autohost Process Flow
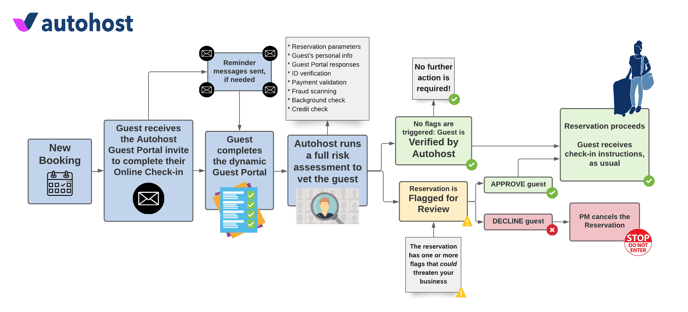
To learn more about the process flow, refer to this help center article.
Update your Listing's Marketing Material
Now that you've learned about the verification process you will introduce to your message flow, it's time to introduce it to your guests, too. Your guests must know that they will be asked to complete a verification step in order to receive their check-in instructions.
To communicate this to the guest, refer to the article Sample Messaging for OTAs for guidance on how to explain the purpose of the Autohost verification process.
Be sure to do this for ALL of your marketing material that guests read. This includes:
-
Your listing description,
-
Rental Usage Agreement
-
House Rules
-
FAQ pages
-
Any other material that is read by the guest.
Handle Pre-existing Reservations
First, let's decide how you'd like to handle the pre-existing reservation.
Pre-existing reservations include guests who will arrive today or in the future. Current guests will not appear.
You have two options:
Option 1: 'Blind' Approve all pre-existing reservations and start fresh
Pick a future date of when you'd like to start screening guests using Autohost.
Option 2: Screen all pre-existing reservations and message guests
Depending on the option you choose, the step we will take will differ slightly. No action is required right now, but keep that in mind as you move to the next step.
Enable Listings on Autohost
Now, let's log on to Autohost, and enable the listings you wish to assign with this new message flow:
-
On Autohost, go to Listings.
-
Enable desired listings by turning the toggle switch on.
Now, let's import your listings and reservations:
-
On Autohost, go to Screening Assistant > Import.
-
Under Import Listings, click START IMPORT. This will tell Autohost to import new listings and update existing ones from Hospitable.
-
Now, we will import your reservations. On this same page, click START IMPORT under Import Reservations (see image below).
-
Next, go to the Reservations tab. Confirm that the number of reservations imported into Autohost matches the number of reservations you have on Guesty. This will tell us that the import was successful. If the numbers do not match, wait a few minutes, and refresh the page.
Note:
If you chose OPTION 1, follow these steps:
Option 1:
-
On Autohost, go to the Reservations tab.
-
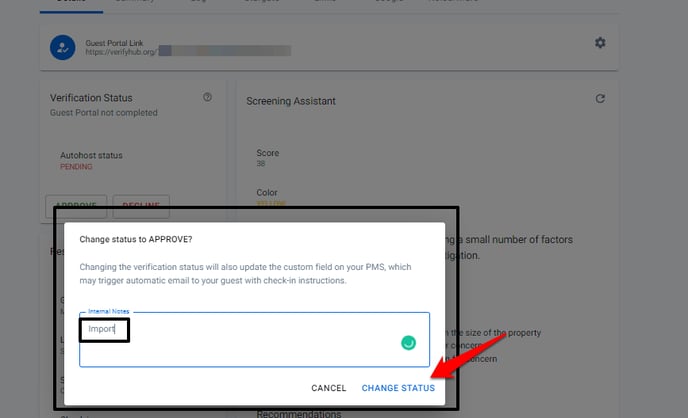
Click on a reservation to view the reservation details tab. Click Approve. You will be prompted to enter a reason.
-
Proceed to enter "import" as the reason (see image below).
-
Save your entry by clicking Change Status.
-
Repeat steps 2-4 for each reservation.
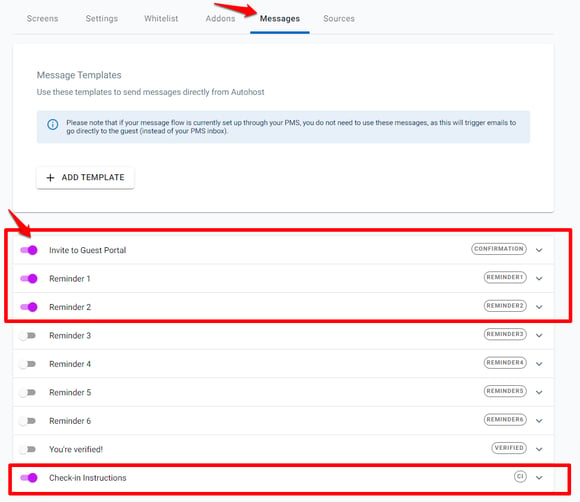
Second, let's switch to the new message flow:
-
On Autohost, go to Guest Portal > Messages.
-
Open the following messages and edit the format and language to your preference:
-
Invite to Guest Portal
-
Reminder 1
-
Reminder 2
-
Check-in Instructions
-
-
Once complete, toggle "on" each message to enable it.
-
Now, proceed to disable the booking confirmation message and check-in instructions message you are currently using.
-
Congrats! You're now officially protecting your properties with Autohost. Take some time to learn the tool, and get comfortable with this new process.