
Table of Contents
Learn about Autohost Process Flow
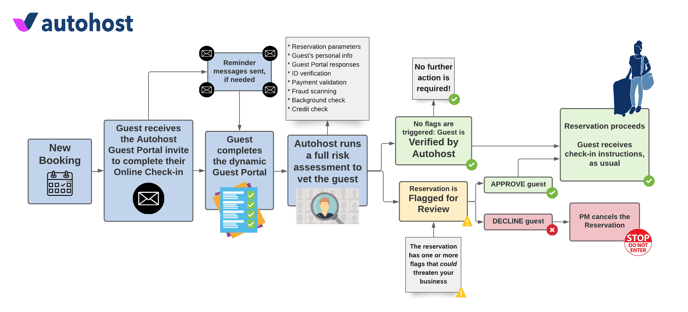
To learn more about the process flow, refer to this help center article.
Create Custom Autohost Track 'Tags'
Track offers its users a feature called tags; a tag is a label attached to a property management (PM) or customer relationship management (CRM) software that allows users to add informational value to data records, such as contact, lead, campaign, reservation, or company.
Configure the custom Autohost tags in your Track by clicking the settings wheel to navigate to Configuration > CRM Setup > Tags.
For the purposes of this implementation, we will be focusing on tags related to the reservation record.
You will create two (2) tags on your Track account. Use the instructions below to guide you:
-
Log on to Track.
-
Click ⚙️ icon to open the Configuration page.
-
Click CRM Setup > Tags.
-
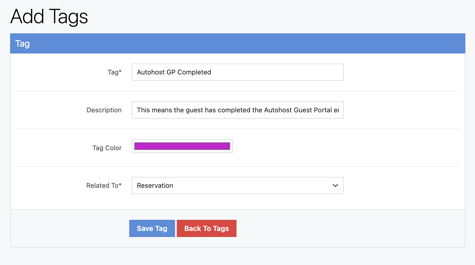
Click + Tags to create the first tag and enter the requested information.
-
Tag*: Autohost GP Completed
-
Description: This means the guest has completed the Autohost Guest Portal end to end.
- Tag Color: choose a tag color that will help identify this tag from any other flags currently in use.
-
Related To*: Reservation
- Click Save Tag.
-
-
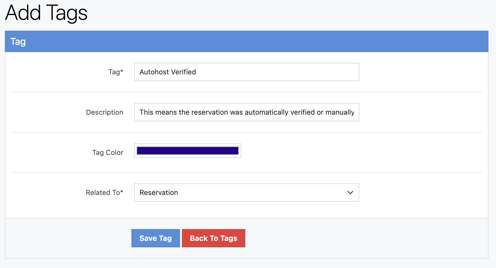
Repeat step 4 to create the second tag. Click Save Tag.
-
Tag*: Autohost Verified
-
Description: This means the reservation was automatically verified or manually approved by your team.
- Tag Color: choose a tag color that will help identify this tag from any other flags currently in use.
- Related To*: Reservation
- Click Save Tag
-
What are the use cases for the Autohost custom tags?
Autohost GP Completed:
-
When a guest has completed the Autohost GP, the remainder of reminder messages will be removed/deleted from the message queue to ensure they do not receive this message in error.
-
When a guest has completed the Autohost GP, the You're Verified message will be sent at the designated time trigger to acknowledge the guest's completion of the Autohost GP.
Autohost Verified:
-
When a guest has completed the Autohost GP AND their reservation has been verified or manually approved, the Check-in Instructions message will be sent to the guest at the designated time you have selected.
Create Autohost Reservation Documents
-
On Track, click the settings wheel to navigate to Configuration > PMS Setup > Reservations > Reservation Documents
-
Click +Reservation Document at the top right
-
Configure the following Message Templates:
Important: If your Guest Portal is hosted on a custom subdomain, be sure to insert the custom domain in place of the generic link (https://verifyhub.org) in all message templates. For more information on this, contact your Autohost Onboarding Specialist or Customer Success Manager.
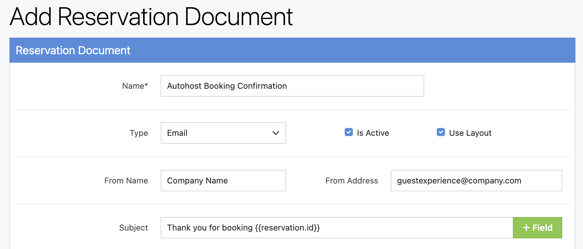
Reservation Document: Autohost Booking Confirmation
Complete the following fields of the Message Template or 'Reservation Document':
Name:
Autohost Booking Confirmation
Type:
Is Active:
Leave default setting as checked.
Use Layout:
Leave default setting as checked.
From Name:
If left blank, will automatically default to primary owner name.
From Address:
If left blank, will automatically default to default email address.
Subject:
Thank you for booking {{reservation.id}}
Content:
Hi {{contact.first}},

Thank you for booking a stay with us!

Please take a moment to review your reservation details:

{{unit.name}}
Check-In Date: {{formatDate reservation.checkin "medium"}}
Check-Out Date: {{formatDate reservation.checkout "medium"}}
Number of Guests: {{reservation.guests}}

To ensure the safety of our guests, staff, properties, and community; we require all guests to complete our secure guest verification portal as noted in our listing description. Please complete the guest verification portal linked below ahead of your check-in date, to ensure your check-in instructions are sent ahead of your arrival.

https://verifyhub.org/{{reservation.uuid}}

*Please note: the above link will be activated 30 minutes after booking confirmation.

If you have any questions, please contact us via email or through your booking platform.

We look forward to hosting you!

Thank you,
{{owner.name}}

Review document for spelling and errors, and save document.
Note: There is a 15 minute sync delay between Track and Autohost, if the guest clicks the Guest Portal link before the reservation has synced the reservation will note 'If you have recently booked a reservation, please hold tight, we are creating your reservation details. Check back again in 30 minutes.'
With that said, we recommend the following options:
Option A: Add the following note in the booking confirmation as shown above: *Please note: the above link will be activated 30 minutes after booking confirmation.'
Option B: Send a booking confirmation without the link but mentions we'll be sending them an email with the guest verification portal shortly, such as 'To ensure the safety of our guests, staff, properties, and community; we require all guests to complete our secure guest verification portal as noted in our listing description. We will send a secure guest verification portal shortly, please complete ahead of your check-in date to ensure your check-in instructions are sent ahead of your arrival."
Note: If you already have a booking confirmation set up, a combination of our recommended template and your current one, may be used. Please keep in mind 'less can be more' in the initial email to avoid the guest losing the call to action, which is of course completing the Autohost Guest Portal / verification.
Create Booking Confirmation Trigger
Create the Booking Confirmation Trigger by following the steps below:
- Click the settings wheel icon in Track to navigate to Configuration > Company Setup > Business Rules > Triggers
- Click +Trigger
- Complete the following fields of the Reservation Trigger:
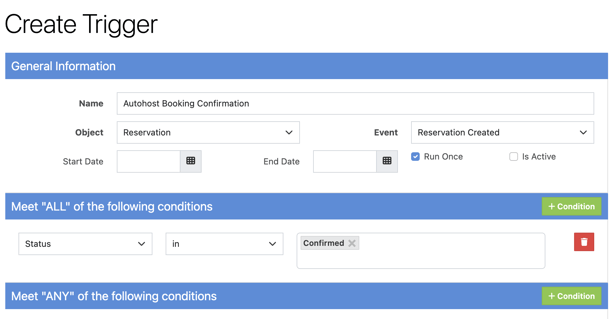
Name:
Autohost Booking Confirmation
Object:
Reservation
Event:
Reservation Created
Run Once:
Default setting of checked.
Is Active:
Leave unchecked until Go Live
Start Date / End Date:
Start Date: Select date of Autohost Go Live for documentation reasons, otherwise leave blank.

End Date: Leave blank.
Meet 'ALL' of the following conditions:
+Condition
Status in Confirmed
Meet 'ANY' of the following conditions:
Leave blank.
Perform These Actions:
+Action
Action: Send Document
To:
Contact
Doc:
Autohost Booking Confirmation (this should automatically apply the message template we created above)
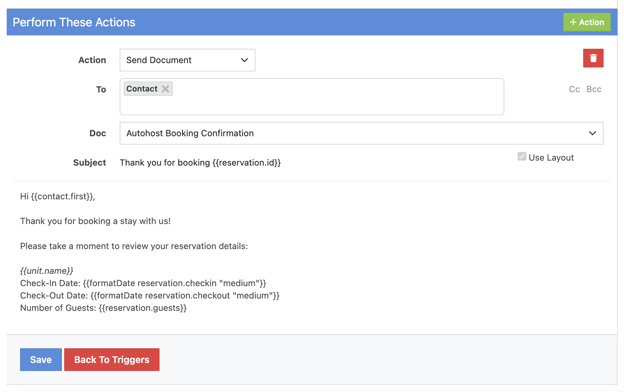
Review for spelling and error, and Save.
Note: Tags are not needed for this message.
Reservation Document: Autohost Reminder(s)
Most guests fall into two different personality types when it comes to booking stays, they either like to get everything done and checked off in advance, or they wait until the last minute to review any information regarding their upcoming stay. To ensure we meet the needs of both personality types, we recommend the following reminder message sequence:
| Reminder 1 (highly recommend): | 1-3 hours after reservation booking |
| Reminder 2 (highly recommend): | 24 hours after reservation booking |
| Reminder 3 (encouraged): | 48 hours after reservation booking |
| Reminder 4 (encouraged): | in sequence with any payment reminders* |
| Reminder 5 (highly recommend): | 7 days before guest arrival |
| Reminder 6 (highly recommend): | 5 days before guest arrival |
| Reminder 7 (highly recommend): | 3 days before guest arrival |
| Reminder 8 (highly recommend): | 2 days before guest arrival |
| Final Urgent Reminder: | 24 hours before guest arrival (or aligned with designated time check-in instructions are sent) |
*If applicable, a reminder for payment in subsequence with a reminder for verification would be a great communication flow.
Note: Reminder messages are utilizing conditional logic by way of 'tags', that will only apply to those guests who have not completed the guest portal. Once guests have completed the guest portal they will not receive any further reminder messages. Additionally, if the property manager approves or declines a guest, it will also discontinue any additional reminder messages.
To begin the configuration of Reminder messages, follow the steps below:
-
On Track, click the settings wheel to navigate back to Configuration > PMS Setup > Reservations > Reservation Documents
-
Click +Reservation Document at the top right
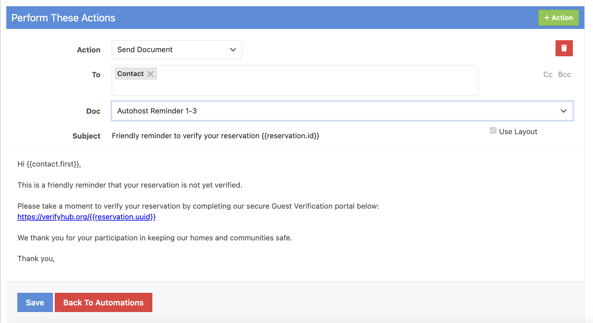
- Complete the following fields to Add Reservation Document:
Name:
Autohost Reminder 1-3 [ 1-48 hours after reservation creation ]
Type:
Email
Is Active:
Leave default setting as checked.
Use Layout:
Leave default setting as checked.
From Name:
If left blank, will automatically default to primary owner name.
From Address:
If left blank, will automatically default to default email address.
Subject:
Friendly reminder to verify your reservation {{reservation.id}}
Content:
Hi {{contact.first}},

This is a friendly reminder that your reservation is not yet verified.

Please take a moment to verify your reservation by completing our secure Guest Verification portal below:
https://verifyhub.org/{{reservation.uuid}}

We thank you for your participation in keeping our homes and communities safe.

Thank you,
{{owner.name}}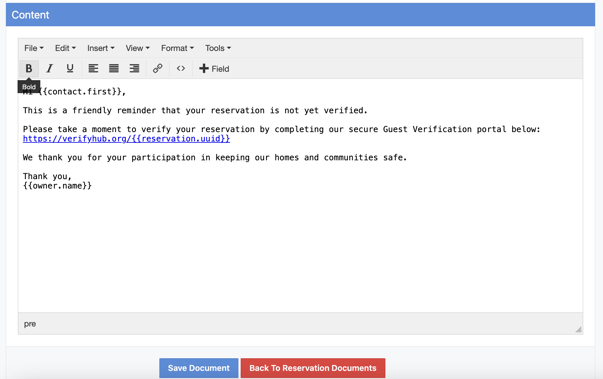
- Review for spelling and error, and Save Document.
- Repeat steps 1 and 2, and complete the following fields to add the next Reservation Document:
Name:
Autohost Reminder 4-8 [ before arrival ]
Type:
Email
Is Active:
Leave default setting as checked.
Use Layout:
Leave default setting as checked.
From Name:
If left blank, will automatically default to primary owner name.
From Address:
If left blank, will automatically default to default email address.
Subject:
Reminder to verify your reservation {{reservation.id}}
Content:
Hi {{contact.first}},

Your stay is quickly approaching!

This is a friendly reminder that your reservation is not yet verified.

Please take a moment to verify your reservation by completing our secure Guest Verification portal below:

https://verifyhub.org/{{reservation.uuid}}

As a reminder, check-in instructions will not be sent until guest verification is complete.

We thank you for your participation in keeping our homes and communities safe!

Thank you,
{{owner.name}}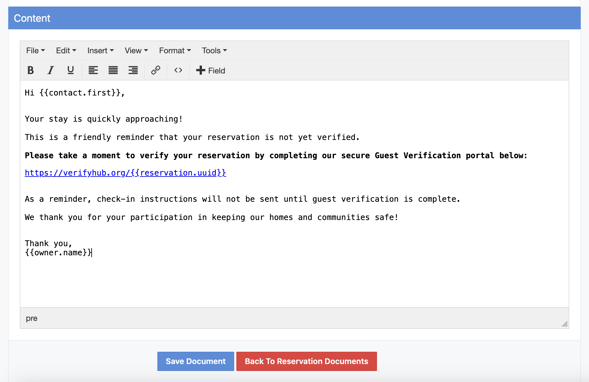
- Review for spelling and errors, and Save Document.
- Repeat steps 1 and 2, and complete the following fields to add the next Reservation Document:
Name:
Autohost Urgent Reminder [ Final Reminder ]
Type:
Email
Is Active:
Leave default setting as checked.
Use Layout:
Leave default setting as checked.
From Name:
If left blank, will automatically default to primary owner name.
From Address:
If left blank, will automatically default to default email address.
Subject:
Urgent Reminder to verify your reservation {{reservation.id}}
Content: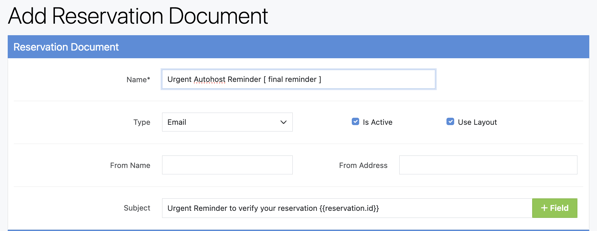
Hi {{contact.first}},
Your check-in instructions can not be sent as we have identified that you have not yet completed our guest verification.
Your stay is at risk of cancellation if guest verification is not completed soon.
To verify your reservation and receive your check-in instructions, please complete the guest verification link below:
https://verifyhub.org/{{reservation.uuid}}
Thank you,
{{owner.name}} 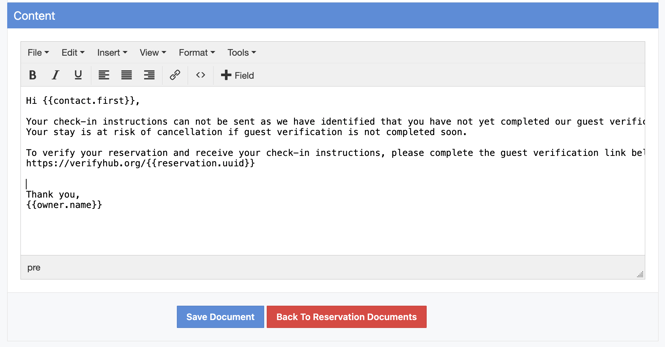 Review for spelling and error, and Save Document.
Create Reminder Automation
To configure the conditional logic and automation for the reminder messages, complete the following steps:
- Click the settings wheel to navigate to Configuration > Company Setup > Business Rules > Automations
- Click +Automation
- Complete the following fields to Create Automation:
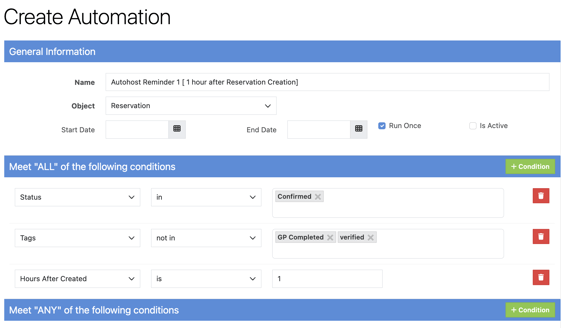
Name:Autohost Reminder 1 [ 1 hour after Reservation Creation ]
Object:
Reservation
Start Date / End Date:
Start Date: To document the start of this new document, otherwise leave blank.
End Date: Leave blank.
Run Once:
Leave as default settings, checked.
Is Active:
Leave unchecked until Go Live
Meet 'ALL' of the following conditions:
Status <in> confirmed

Tags <not in> GP Completed & Verified

Hours After Created <is> 1
Meet 'ANY' of the following conditions:
Leave blank.
Perform These Actions:
Action: Send Document
To: Contact
Doc: Find Autohost Reminder 1-3 for after reminders after reservation creation.
- Review for error and Save.
- Repeat steps 1-4, but change the 'Hours after created' condition to a different time frame, use the recommended Reminder sequence above for reference.
- Create the Automation for Reminders 4-8 by following the steps 1-4, but change the 'Hours After Created' to 'Days Before Check-in' and the Doc: to the Reservation Document created for Reminders 4-8.
- Create the Automation for the Urgent Reminder by following steps 1-4, but changing the 'Hours After Created' to 'Days Before Check-in' to match with the day you'd typically send your check-in instructions. Also change the Doc: to the Reservation Document created for the Urgent Reminder.
- Review all automations for error and Save.
(Optional) You're Verified Message
In Autohost, there are messaging capabilities under Guest Portal > Messages. If you prefer a guest receives a notification once their reservation has been verified, you may send over the Autohost "Verified" message. While this message can be edited and tweaked, the message reads:
"Hi {{guest_first_name}},

Your reservation is now confirmed, we look forward to hosting you!

Please review your reservation details:

{{listing_name}}

Check-In: {{check_in_date}}

Check-Out: {{check_out_date}}

Number of guests: {{number_of_guests}}

You will receive your detailed check-in instructions a few days prior to your arrival, but be sure to let us know if you have any questions in the meantime. You can contact us by replying to this email or through your booking platform. You can also reach us by phone at .

Thank you,

{{host_name}}"
Note: From the conditions in Track, we have not identified a Trigger/Automation that would push the message to send immediately after the reservation was verified/approved in Autohost which is why we encourage for this message in particular to be sent directly from Autohost.
The default 'Timing Rules' imply for the message to be sent as soon as the Verified/Approved condition is met, so please do not change the timing rules. Additionally, the 'Message type (tag) is the message type identifier in which the conditional logic is used, so do not change this default setting either. Lastly, the 'Send via' should also remain as Autohost.
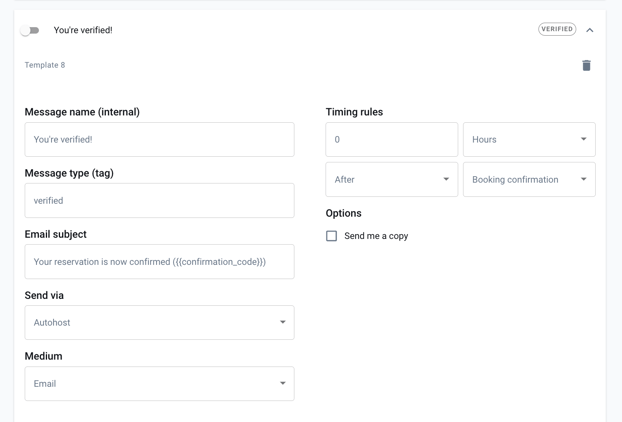
The Message name (internal) can be renamed to your choosing, and the communication may be sent from both Email or SMS as the 'Medium'.
To edit the communication, just overwrite the text, and remember to click 'Save'.
To turn this communication on, utilize the toggle on the left hand side.
Reservation Document: Autohost Check-In Instructions
Create the Check-In Instructions Reservation Document by following the steps below:
-
On Track, click the settings wheel to navigate to Configuration > PMS Setup > Reservations > Reservation Documents
-
Click +Reservation Document at the top right
- Create the check-in instructions reservation document as desired.
- Review for spelling and error, and SAVE.
Tip: Utilizing 'custom fields' streamlines the process of including reservation and listing details directly into messages. This feature is especially beneficial when sending check-in instructions, allowing for a single message that automatically includes all necessary information for any listing, eliminating the need for separate instructions for each listing. For assistance with setting up custom fields for your listings, don't hesitate to contact your Track representative for support.
Create Check-In Instructions Automation
Create the Autohost Check-in Instructions automation, by following the steps below:
- Click the settings wheels on the top right to navigate to Configuration > Company Setup > Business Rules > Automations
- Click +Automation to create a new automation.
- Complete the following fields:
Name:
Autohost Check-in Instructions
Object:
Reservation
Start/End Date:
For the 'Start Date' you may add the Go Live date for documentation reasons, or leave blank.
End Date leave blank.
Run Once:
Leave default settings as checked.
is Active:Leave unchecked until 'Go Live'
Meet 'ALL' of the following conditions:
Tags <in> Autohost Verified
Meet 'ANY' of the following conditions:
Days Before Check-In <is> _add desired days_ (recommend 1-3 days before)Leave blank.
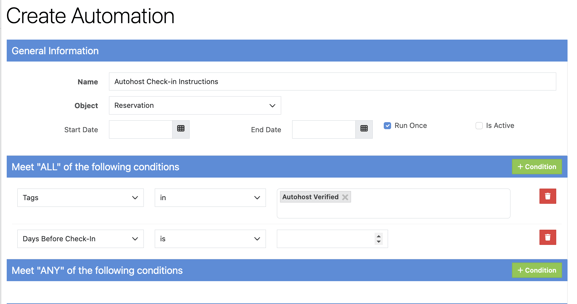
Perform These Actions:
Action: Send Document

To: Contact

Doc: Autohost Check-In Instructions
- Review for error and save.
Congratulations you've successfully configured your messages! Once you are ready to Go Live, you'll simply need to switch all corresponding triggers and automations to 'is Active' by selecting the check mark!