
Table of Contents
Learn about Autohost Process Flow
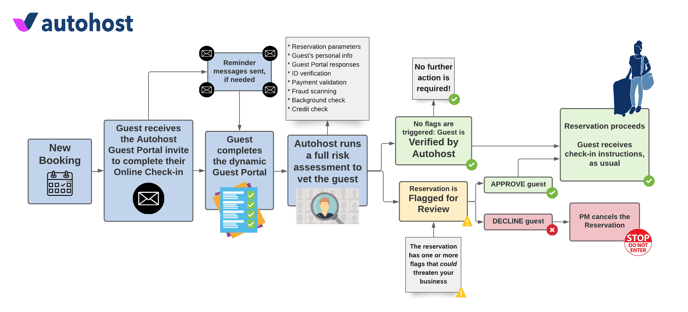
To learn more about the process flow, refer to this help center article.
Learn about Autohost Stargate
Autohost Stargate is an email relay system.
Its purpose is to act as a gatekeeper in your online communications with guests, which allows Autohost's Screening AI to complete a risk analysis on the guest's reservation. The results of this analysis will determine whether or not to send the check-in instructions to the guest
Autohost Stargate uses verification-dependent filters to determine whether to send the guest specific messages, such as check-in instructions or the house manual.
To learn more about Autohost Stargate, refer to this help center article.
This is your current guest communication flow:
Escapia > Guest
Your pre-check-in messages to the guests are configured on and sent by Hostaway.
This will be your new guest communication flow:
Autohost > Guest
Your pre-check-in messages to guests are configured on Autohost and will pass through Autohost Stargate to ensure the right conditions are met before a message is sent to the guest.
Set up your Message Templates
First, let's create a new listing that we will use for testing purposes:
-
On Escapia, click on Listings button on the left navigation menu.
-
Click Create New +.
-
Name the listing as "Autohose House - Test" and proceed to fill out the required fields.
-
Once complete, click Save.
Now, let's create our messages by following the instructions below. Label the messages as the following:
1. AH Booking Confirmation
-
On Autohost, go to Guest Portal > Messages.
-
Click Guest Portal Invite to open editor access to the template.
-
Fill out the template with the requested details. Be sure to select SMS as the communication medium.
-
Review for spelling and error.
-
Click Save.
2. AH Reminders
-
On Autohost, go to Guest Portal > Messages.
-
Click Reminder 1 and Reminder 2 to open editor access to the templates.
-
Fill out the templates with the requested details. Be sure to select SMS as the communication medium.
-
Review for spelling and error.
-
Click Save.
3. AH Check-In Instructions
-
On Autohost, go to Guest Portal > Messages.
-
Click Check-in Instructions to open editor access to the templates.
-
Fill out the template with the requested details. Be sure to select email as the communication medium.
-
Review for spelling and error.
-
Click Save.
Your new templates have now been set up. We will keep them toggled OFF/deactivated for the time being as we prepare for go-live.
Upon completing these templates, go to Settings > Stargate and toggle ON the setting Prioritize emails captured on the Guest Portal. This feature will give you the ability to contact the guest via email when they enter the Guest Portal.
If your Guest Portal is hosted on a custom subdomain, be sure to insert it in place of the generic link (https://verifyhub.org). For more information on this, contact your Autohost Customer Success Manager.