
Table of Contents
Learn about Autohost Process Flow
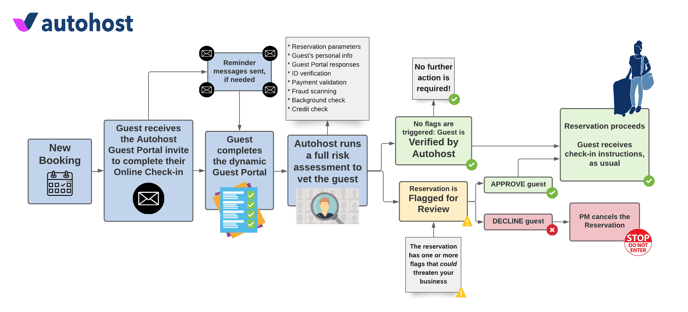
To learn more about the process flow, refer to this help center article.
Learn about Autohost Stargate
Autohost Stargate is an email relay system.
Its purpose is to act as a gatekeeper for your Autohost specific communications.
Stargate uses verification-dependent filters to release (or withhold) specific messages, such as the 'reminder' messages and the 'check-in instructions' message.
Each guest will have an assigned verification status, and Stargate will release or withhold a message dependent on the status for example:
If a guest is in 'pending' status, Stargate will identify to continue to release the 'reminder' message.
Whereas, if the guest is in pending or declined status, Stargate will withhold the release of the check-in instructions.
To learn more about Stargate, refer to this help center article.
Hostfully | Autohost Workflow:
Likely, your current message flow is:
Hostfully > Guest
Pre-check-in messages are automated to be sent to guests by Hostfully.
This is your new message flow:
Hostfully > Autohost > Guest
Your pre-check-in messages to guests will first pass through Autohost Stargate, to ensure the right conditions are met before the messages are released to the guest.
Below, is a visual presentation of your new Hostfully | Autohost workflow:

Now that we understand our new workflow, let's begin to configure the templates and triggers in Hostfully.
First, let's add "Autohost Stargate” as a 'team member' this will allow you to send specific communications to Autohost Stargate rather than the guest as noted above. For more information on roles & permissions with Hostfully view this article here.
-
On Hostfully, go to Agency Settings.
-
Click Invite team members.
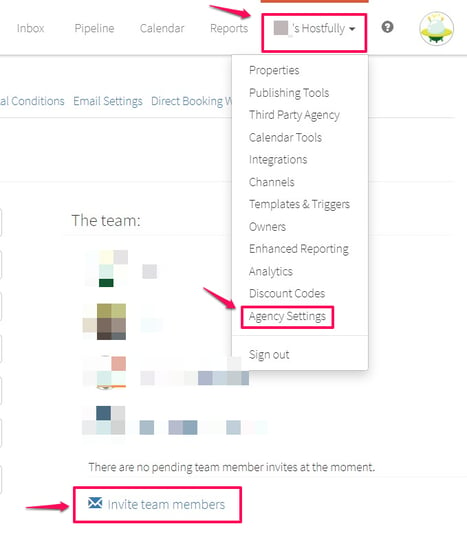
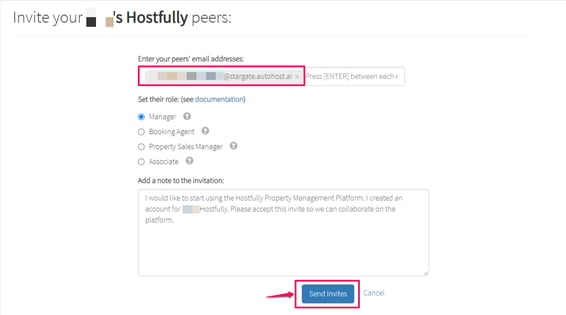
- Send the invite to your dedicated Stargate email address, which you can find in your Autohost account under Settings > Stargate (see image below).
- Set their role as 'Manager', as seen below:
-
Click 'Send Invites' to continue.
-
Once sent, the Autohost Onboarding Specialist will approve the invite request from the invite email sent and will set a temporary password for login to be 'AHStargate123'.
-
Once you receive confirmation from your Autohost Onboarding Specialist, log into Hostfully as Autohost Stargate using your dedicated email address and the password provided. You’ll now be able to see the new user 'Autohost Stargate' under your 'team'.
-
Click into the account to change the password, utilizing the red 'Change password' button. Keep this information safe in a password manager.
Great job! Now, let's set up the templates and triggers for the following communications:
1. Autohost Booking Confirmation
-
On Hostfully, go to the account drop-down, select 'Templates & Triggers'
- Select 'Custom Templates' subtab.
-
Click 'Create a template' > 'Email template'.
-
Proceed to fill out the following fields, and click 'Save Template' at the bottom.
Name:
Autohost Booking Confirmation
Subject:
Thank You For Booking [$LEAD_UID$]
Hi [$GUEST_FIRST_NAME$],

Thank you for booking a stay with us.

Here are your reservation details:

[$PROPERTY_NAME$]
Check-in: [$LEAD_CHECKIN$]
Check-out: [$LEAD_CHECKOUT$]
Number of Guests: [$LEAD_GUESTS$]

To ensure the safety of our guests, staff, properties, and community; we require all guests to complete our secure guest verification portal as noted in our listing description. Please complete the guest verification portal linked below ahead of your check-in date, to ensure your check-in instructions are sent ahead of your arrival.

https://verifyhub.org/[$LEAD_UID$]

We look forward to hosting you!

Thanks,
Your host

#AHP#hostfully:email:[$LEAD_UID$]:confirmation#AHP#
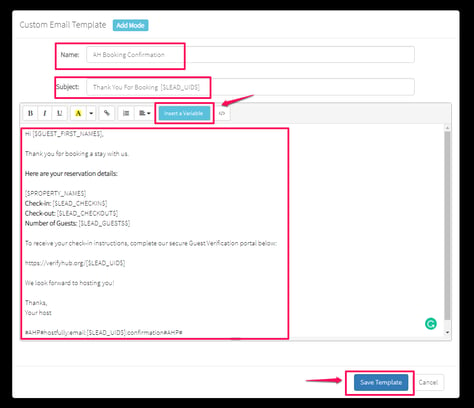
Note: Notice the code snippet at the bottom of the body of the email. This code snippet tells Autohost Stargate what type of communication it is, therefore, which logic to follow. To read the code snippet, review the explanation below:
#AHP#hostfully:email:[$LEAD_UID$]:confirmation#AHP#
AHP = Autohost Guest Portal
hostfully = the PMS to expect the communication from
email = how the communication will be sent from Autohost to the Guest
[$LEAD_UID$] = the reservation code variable for this specific reservation
confirmation = communication type is a booking confirmation email
AHP = again, the Autohost Guest Portal to close the code snippet
Great job on completing the 'Autohost Booking Confirmation' Template, now, let's create the associated trigger for the Autohost Booking Confirmation template:
PLEASE NOTE: Hostfully does not have offer an ability to temporarily disable a trigger. If it is created, it is on. Therefore, to set this up in advance of your 'Go Live' call, add a condition that would break the trigger for example, a property that is no longer listed, or a channel that is not currently used.

-
On Hostfully, return to Templates & Triggers.
-
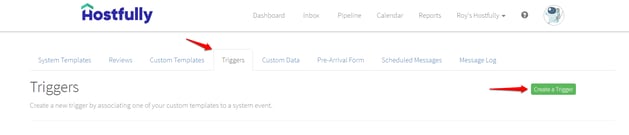
Click the subtab 'Triggers'.
- Click the green 'Create a Trigger' button.
-
Proceed to fill out the following fields, and then click 'Create Trigger' at the bottom of the screen to save.
.png?width=532&height=611&name=Screenshot_How%20to%20Create%20a%20Template%20Trigger%20on%20Hostfully%20(Part%202).png)
Now, let's create templates for the reminder messages.
2. Autohost Reminders
The following message reminders can be set up at the time frames you feel are most appropriate to your guests. However, we recommend the following reminder message sequence:
| Reminder 1: | 30 days before guest check-in |
| Reminder 2*: | *in sequence with any payment reminders |
| Reminder 3: | 14 days before guest check-in |
| Reminder 4: | 7 days before guest check-in |
| Reminder 5: | 5 days before guest check-in |
| Reminder 6: | 3 days before guest check-in |
| Reminder 7: | 2 days before guest check-in |
| Final Reminder: | 1 day before guest check-in or in sequence with the typical day/time that the guest receives their check-in instructions |
*If applicable, a reminder for payment in subsequence with a reminder for verification would be a great communication flow.
As a reminder, messages will discontinue once the guest has completed the guest portal.
Begin to configure the reminder messages by following the steps below:
- On Hostfully, go to the account drop-down, select 'Templates & Triggers'
- Select 'Custom Templates' subtab.
- Click 'Create a template' > 'Email template'.
- Proceed to fill out the following fields, and click 'Save Template' at the bottom.
Proceed to fill out the following template fields for Reminders 1-3:
Name:
Autohost Reminder 1-3
Subject:
Verify Your Upcoming Reservation [$LEAD_UID$]
Hi [$GUEST_FIRST_NAME$],

This is a friendly reminder that your reservation has not yet been verified.

To ensure the safety of our guests, staff, properties, and community; we require all guests to complete our secure guest verification portal as noted in our listing description. Please complete the guest verification portal linked below ahead of your check-in date, to ensure your check-in instructions are sent ahead of your arrival.

https://verifyhub.org/[$LEAD_UID$]

This process will only take a few minutes. We thank you for your participation in keeping our homes and communities safe!
Thanks,
Your host

#AHP#hostfully:email:[$LEAD_UID$]:reminder1#AHP#
%20on%20Hostfully.png?width=571&height=438&name=Screenshot_How%20to%20Create%20a%20New%20Custom%20Template%20(Reminder%201)%20on%20Hostfully.png)
Note: The part of the code snippet that identifies which kind of communication type it is will need to changed from 'reminder1' to 'reminder2' and 'reminder3' and so on, for each reminder message you create.
#AHP#hostfully:email:[$LEAD_UID$]:reminder1#AHP#
Proceed to fill out the following template fields for Reminders 4-7:
Name:
Autohost Reminder 4-7
Subject:
Reminder To Verify Your Upcoming Reservation [$LEAD_UID$]
Hi [$GUEST_FIRST_NAME$],

Your stay is quickly approaching! This is a friendly reminder that your reservation is not yet verified.

Please take a moment to verify your reservation by completing our secure Guest Verification portal below:

https://verifyhub.org/[$LEAD_UID$]

As a reminder, check-in instructions will not be sent until guest verification is complete.

We thank you for your participation in keeping our homes and communities safe!

Thanks,
Your host

#AHP#hostfully:email:[$LEAD_UID$]:reminder4#AHP#
%20on%20Hostfully.png?width=573&height=390&name=Screenshot_How%20to%20Create%20a%20New%20Custom%20Template%20(Reminder%202)%20on%20Hostfully.png)
Proceed to fill out the following template fields for the Final Urgent Reminder:
Name:
Autohost Final Urgent Reminder
Subject:
Urgent Reminder To Verify Your Upcoming Reservation [$LEAD_UID$]
Hi [$GUEST_FIRST_NAME$],

Your check-in instructions can not be sent as we have identified that you have not yet completed our guest verification. Your stay is at risk of cancellation if guest verification is not completed soon. Please complete our secure guest verification portal below:

https://verifyhub.org/[$LEAD_UID$]

We thank you for your participation in keeping our homes and communities safe!

Thanks,
Your host

#AHP#hostfully:email:[$LEAD_UID$]:reminder8#AHP#
Well done! Now, let's create the associated Autohost Reminder triggers.
-
On Hostfully, return to Templates & Triggers.
-
Click the subtab 'Triggers'.
- Click the green 'Create a Trigger' button.
-
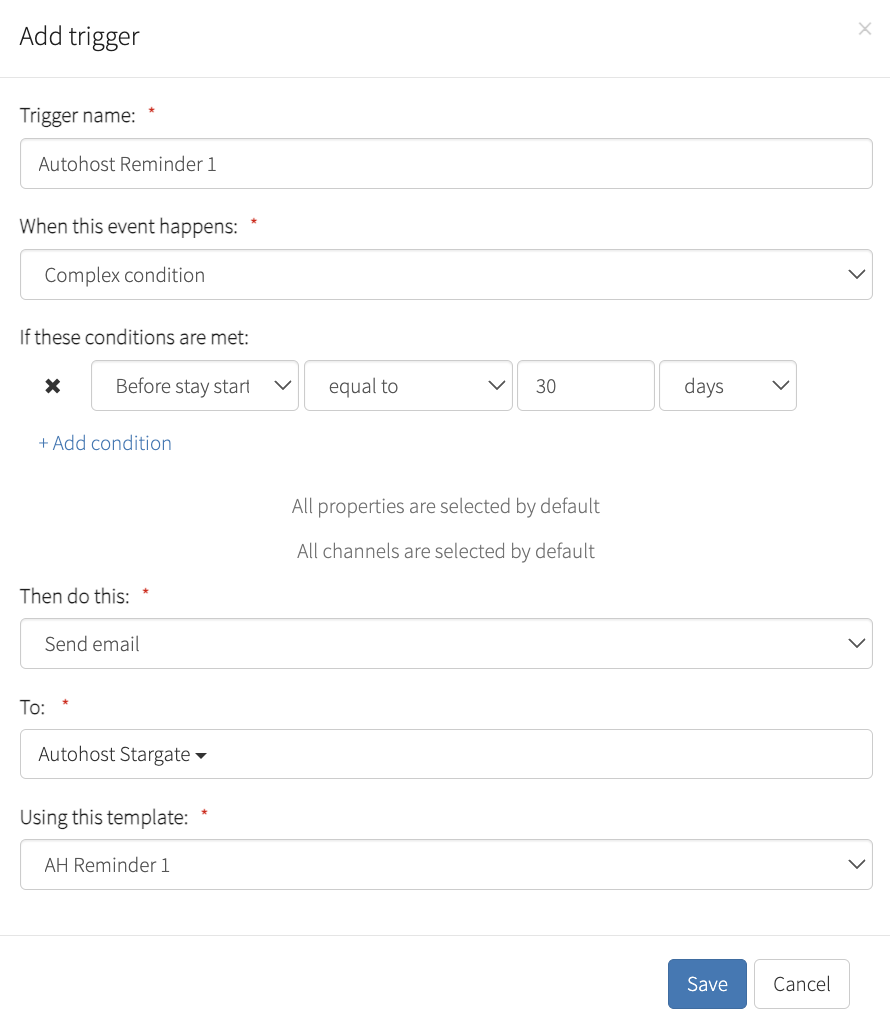
Proceed to fill out the following fields, and then click 'Create Trigger' at the bottom of the screen to save.
Autohost Reminder (_)
When this event happens:
Complex Condition
If these conditions are met:
<Before stay starts> < equal to > < X > < days >
Then do this:
Send email
To:
Autohost Stargate
Using this template:
Autohost Reminder 1
Repeat the above steps for the associated Triggers for Reminders 2-8
Autohost Check-In Instructions
Follow the steps below to create the Autohost Check-In Instructions template:
-
On Hostfully, go to the account drop-down, select 'Templates & Triggers'
- Select 'Custom Templates' subtab.
-
Click 'Create a template' > 'Email template'.
-
Proceed to fill out the following fields, and click 'Save Template' at the bottom.
Name:
Autohost Check-In Instructions
Subject:
Your Upcoming Reservation [$LEAD_UID$]
Hi [$GUEST_FIRST_NAME$],

Thank you for verifying your reservation. We are looking forward to hosting you!

Here are your check-in details:

[INSERT CHECK-IN DETAILS HERE]

Thanks,
Your host

#AHP#hostfully:email:[$LEAD_UID$]:ci#AHP#
%20on%20Hostfully.png?width=672&height=467&name=Screenshot_How%20to%20Create%20a%20New%20Custom%20Template%20(AH%20Check-In%20Instructions)%20on%20Hostfully.png)
[INSERT CHECK-IN DETAILS HERE] is a placeholder for your check-in instructions. It is recommended for scalibility that you utilize custom variables on the listing level to have a singular check-in instructions template that meet the needs of all properties.
Alternatively, you may keep your current check-in instructions email and update the associated trigger to send to Autohost Stargate, rather than directly to the guest.
Now that you've prepped your Check-in Instructions template, let's create the associated trigger:
-
On Hostfully, return to Templates & Triggers.
-
Click the subtab 'Triggers'.
- Click the green 'Create a Trigger' button.
-
Proceed to fill out the following fields, and then click 'Create Trigger' at the bottom of the screen to save.
Trigger name:Autohost Check-In Instructions
When this event happens:
Complex Condition
If these conditions are met:
<Before stay starts> < equal to > < X > < days >
Then do this:
Send email
To:
Autohost Stargate
Using this template:
Autohost Check-In Instructions
Congratulations! You've successfully configured your new Autohost | Hostfully Guest Communication Workflow.