
Table of Contents
- Quick Refresh: Review the Autohost Process Workflow
- Enable Listings on Autohost
- Import Pre-Exisiting Reservations
- Handle Pre-Existing Reservations
Quick Refresh: Review the Autohost Process Flow
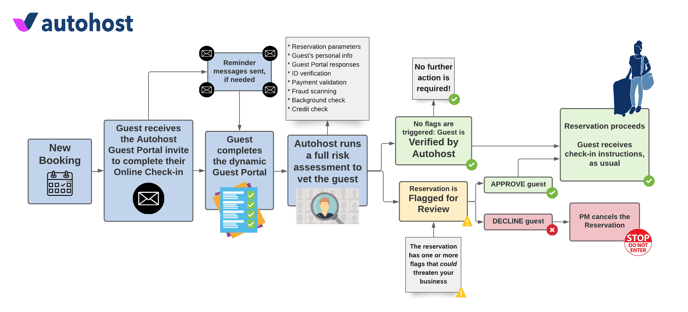
To learn more about the process flow, refer to this help center article.
Enable Listings on Autohost
- Log into Autohost and select the 'Listings' tab.

- Filter your listings to 'Inactive' or 'All'.
- Select all listings by clicking the box adjacent to the word 'Nickname' or desired listings (if preferred) by selecting the box adjacent to the listing name.

- Once a listing is selected, a 'Bulk Edit' button will appear, use the drop-down to select 'Set listings as ACTIVE'.
Congratulations your enabled listings are live in Autohost! Any new reservations will automatically flow into 'active' listings.
Import Pre-Existing Reservations
Once listings are active, next we'll need to import any pre-existing, future reservations associated to the active listings. You will only need to do this for pre-existing reservations, if none exist, the following steps do not apply.
- On Autohost, navigate to the Screening Assistant tab on the left.
- Navigate to the subtab 'Import'.
- Click 'START IMPORT' under Import Reservations.

Reservations will now begin to import in the 'Reservations' tab. It is recommended that you check the total number of your future reservations in Guesty, beginning with check-in today to the future, to ensure you receive all future reservations. You will have a reservation total at the top of the page as shown below. If any reservations are missing, reach out to your Onboarding Specialist and/or Support at support@autohost.ai right away.

Handling Pre-Existing Reservations
Pre-existing reservations include guests who will arrive today or in the future. Current guests will not appear.
While it is important that all future reservations are in Autohost for clarity, consistency, and the retrieval of the check-in instructions (given your new Autohost workflow), ask yourself the following:
Would you prefer the pre-existing reservations be screened with your new guest screening workflow OR would you prefer for the guest to be approved and know nothing about your guest screening process as it stood when they booked? OR, the final option, would you prefer to choose a specified date where some reservations that are further out are screened and reservations in the coming days are simply approved?
Let's break this down into three formal options:
Option 1 (Safest Option): Screen ALL Pre-Existing Reservations with Autohost
Option 2 (Easiest Option): 'Blind' Approve ALL Pre-Existing Reservations
Option 3 (Recommended): (Both) Select a Date that will 'blind' approve all pre-existing reservations beginning today to a specified date, and screen all guests from that specified date onward.
Caution: Before proceeding with Options 1, 2, or 3 ensure all pre-existing reservations have uploaded into Autohost.
Tip: On the Reservations tab, at the bottom of the page, change your 'Rows per page' to 100. That way you can see the maximum amount of reservations on one screen.
To bulk send the 'Guest Portal Invite message' or to 'Blind Approve' you'll need to do this by individual page, therefore you'll want to decrease the number of pages by increasing the number of reservations shown on each page.
Option 1: Screen ALL Pre-Existing Reservations with Autohost
If you chose Option 1: Screen ALL Pre-Existing Reservations, you've chosen the safest option. At Autohost, we believe in the importance of thorough guest screening, however, these guests who've booked before you implemented Autohost will need to know that they now have 'missed' or have an incomplete step that they'll need to complete in order to receive their check-in instructions. Therefore, the first thing we'll need to do is prep their first communication, introducing them to the 'Guest Portal'. This communication will be sent via Autohost to the Guest via the Guesty platform. Once the communication is prepped, and turned on, we'll send the communication to all pre-existing reservations utilizing a multi-select 'bulk' link. Now, let's get started!
- Log onto Autohost
- Select the Guest Portal tab > subtab 'Messages'

- Review the communication labeled 'Guest Portal Invite' by utilizing the down arrow on the right, this will maximize the communication.

- Edit the Message Options as required below:
- Edit the 'Email subject' to your liking.
- Change the 'Send via' to 'Guesty'
- Change the 'Medium' to 'Platform'
-
Edit the Message Body to your liking, here is an example template:
Hello ,

We're looking forward to hosting you!

To ensure the safety of our guests, staff, properties, and community; we require all guests to complete our secure guest verification portal as noted in our listing description. Please complete the guest verification portal linked below ahead of your check-in date, to ensure your check-in instructions are sent ahead of your arrival.

https://verifyhub.org/

If you have questions, please contact us via email or through your booking platform.

We look forward to hosting you!

Thank you, - Once the communication is to your liking, click the SAVE button.

- Turn the communication on by utilizing the toggle adjacent to the internal message name.

- Open this link/URL: https://portal.autohost.ai/reservations/?onboard=1
- Once on this page, you will see your Reservations tab, seemingly as normal, however, now you'll find boxes adjacent to the Guest's names as shown below, that are typically not there.

- Select the checkbox adjacent to 'Name' to select all.
- Click the 'BULK EDIT' button and select 'Send Guest Portal invite messages'.
- Scroll down to the bottom of the page, and go to the following pages (if applicable), and repeat steps 10 & 11 until all reservations have been selected.
- After a few minutes have passed, please go back to Guest Portal > Messages > and disable the Guest Portal Invite message by utilizing the same toggle you used to turn the communication on.
- Proceed to 'Enable New Message Flow in Guesty'
Option 2: 'Blind' Approve ALL Pre-Existing Reservations
If you chose Option 2: 'Blind' Approve ALL Pre-Existing Reservations this means you want all pre-existing reservations approved and will therefore receive their check-in instructions regardless of guest screening through Autohost. This method allows these guests to never know anything about your new guest screening process if you do not want them to. To continue, follow the steps below:
-
Log onto Autohost
-
Open this link/URL: https://portal.autohost.ai/reservations/?onboard=1
- Once on this page, you will see your Reservations tab, seemingly as normal, however, now you'll find boxes adjacent to the Guest's names as shown below, that are typically not there.
- Select the checkbox adjacent to 'Name' to select all.
- Click the 'BULK EDIT' button and select 'Blind approve'.
- Scroll down to the bottom of the page, and go to the following pages (if applicable), and repeat steps 10 & 11 until all reservations have been selected.
Next, proceed to 'Enable New Message Flow in Guesty'
Option 3: Select desired date to screen specific pre-exisiting reservations.
If you've chosen Option 3, you have decided that beyond X date, you will want all guests to be screened regardless of when they've booked. We recommend this option for hosts that have reservations booked well in advance, more than 3-6 months out, so that once they've fully adopted Autohost into their day-to-day processes they are not disappointed when something happens they had the implemented tools to prevent it. To do this we are going to complete some steps from Option 1 and some steps from Option 2, but the sequenced steps are to be followed below:
- Complete steps 1-7 of Option 1 above.
- Once Steps 1-7 of Option 1 are completed, open this link/URL: https://portal.autohost.ai/reservations/?onboard=1
- Once on this page, you will see your Reservations tab, seemingly as normal, however, now you'll find boxes adjacent to the Guest's names as shown below, that are typically not there.
- Identify the date you've chosen to begin screening all guests regardless of the date booked. The 'Dates' column will automatically sort all reservations by soonest arrival date. From here, utilize that information to select the appropriate boxes adjacent to the guest's name to select which reservations you will 'Blind approve'.
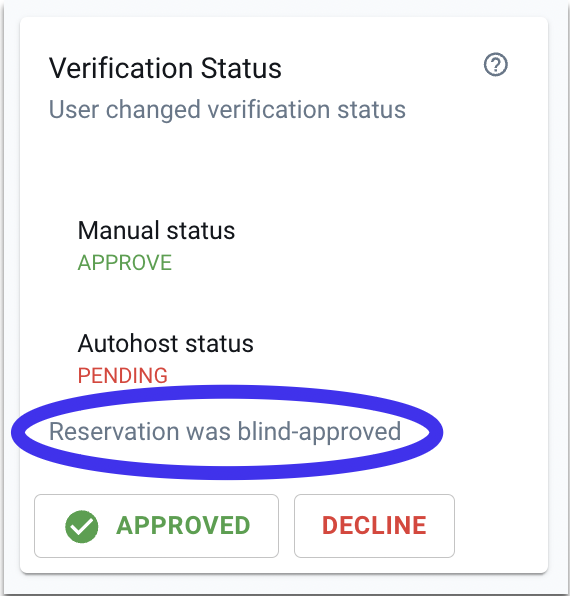
- Select the boxes adjacent to all appropriate reservations and click the 'BULK EDIT' button to choose 'Blind approve'. Once clicked, you will begin to see all Reservation Statuses on the right change from 'PENDING' to 'APPROVED'. Note: All reservations will be marked with an internal note on the Reservation Details page that will look like this:
- Select all remaining reservations, and click the 'BULK EDIT' button to choose 'Send Guest Portal invite messages'. Note: If multiple pages of Reservations exist, ensure you bulk edit by page, to select all reservations.
- After a few minutes have passed, please go back to Guest Portal > Messages > and disable the Guest Portal Invite message by utilizing the same toggle you used to turn the communication on.
- Proceed to 'Enable New Message Flow in Guesty'
Enable the Automation: 'Autohost Workflow' in Guesty
-
Log on to Guesty.
-
Navigate to the 'Automations' tab at the top.
-
Locate the 'Autohost Workflow' created from this guide: https://help.autohost.ai/knowledge/guesty-message-setup-guide-workflows
-
Review the workflow to ensure all settings including desired listings/properties and booking sources/channels are all set appropriately, and check all communications for spelling/error.
-
Click 'Activate' if you are in the automation, or utilize the toggle, to activate the workflow.
-
Now, locate any active existing workflows, and switch the toggle OFF to deactivate.
Congratulations you are now live with your Autohost | Guesty integration! You are now protecting your property, staff, neighbors, and guests by utilizing a comprehensive, automated guest screening: Autohost!
Pat yourself on the back, it was quite a journey, but it will be well worth the pay off!
Take the next few days to learn the tool, and get comfortable with your new guest screening process. To help you apply your learnings from this implementation, bookmark, share, and read the following article with your team: You're Live... Now What?
If you have any questions along the way, our Support Team (support@autohost.ai) are here to help!